Growing Potatoes in Grow Bags

How to Grow Potatoes in Bags
Growing potatoes in a grow bag is perfect if you have limited space. Growing potatoes without the need for a traditional garden bed can improve space usage. With minimal investment in materials and just a bit of effort, you can enjoy the satisfaction of harvesting your own homegrown potatoes. Here we’ll cover everything you need to know before you start growing potatoes in bags.
Choosing the Right Bag
Materials
Choosing the right materials will jumpstart your success. While we have even seen people use plastic garbage bags, we don’t recommend it. Plastic bags will not provide adequate air circulation. Our favorite bags for growing potatoes are fabric grow bags. They are breathable and incredibly strong.
Grow bags come in a variety of sizes. You can do several small ones or go with large 50 gallon or 200 gallon bags.
Size
The size of your potato grow bag is essential. You need to give your potatoes enough space to grow strong and healthy. A recommended size for a grow bag is a minimum of 25 gallons, which is spacious enough for tubers to develop without overcrowding. You can adjust the size depending on the number of potato plants you would like to grow. If you’d like a sizable harvest we recommend using a 50 gallon or larger.
Drainage Features
Good drainage is vital for potatoes, especially when growing in a bag. You want to prevent waterlogging, which can lead to root rot. This is one of the benefits of the fabric grow bags because the fabric drains evenly there is no chance of water pockets causing your seed potatoes to rot before they sprout. They drain much more evenly than pots with drainage holes.
Selecting the Perfect Seed Potatoes

Type of Potato
When choosing seed potato varieties for growing in a bag, consider the type and variety that works best for your needs. Early spring varieties, such as 'Swift' or 'Rocket,' are ideal for growing in bags. They have a shorter growing season and produce a smaller, more manageable harvest. For bigger storage potatoes yukon gold and russet are excellent choices.
For a more organic approach, consider selecting organic seed potatoes to ensure that your crop is free from chemicals and pesticides. You can order seed potatoes online and we often see them at our local garden centers, too. Avoid using store potatoes from your average grocery stores. These can carry disease that will only appear as the plants grow or when your are harvesting potatoes.
The Chitting Process
Before planting your seed potatoes in a bag, it's time to go through the chitting process. Don’t worry if you’ve never heard of chitting. It’s a simple process and just means the practice of encouraging the potatoes' eyes to sprout before planting. This helps to speed up the growth process once they are in the bag, leading to an earlier harvest.
To chit your seed potatoes, follow these simple steps:
- Inspect the potatoes: Look for firm seed potatoes with multiple eyes, as these will produce the most shoots. Dispose of any soft, wrinkled, or visibly damaged potatoes.
- Place them in a container: Use a shallow container, such as an egg carton or a tray, and place the seed potatoes in it with the eyes facing upwards.
- Provide proper light and temperature conditions: Keep your seed potatoes in a cool, dry, and well-lit area, such as a windowsill. The ideal temperature for chitting is between 50°F (10°C) and 70°F (20°C).
- Allow time for sprouting: The chitting process usually takes 4-6 weeks. When the shoots are about 0.5-1 inch (1-2.5 cm) long, they are ready to be planted in your bag.
By selecting the best type of potato and following the chitting process, you're setting yourself up for a successful harvest of potatoes grown in a bag. This is particularly important if you are only planting a smaller amount. The more you can guarantee success, the better.
Preparing Your Bag for Planting
Growing potatoes in a bag is a simple and effective way to produce your own crop without the need for a traditional garden. In this section, we will cover how to prepare your bag for planting, with a focus on adding the correct medium and employing the layering technique.
Adding the Growing Medium
To start, you will need to prepare a suitable growing medium for your potatoes. A combination of soil and compost is ideal to ensure proper drainage and provide essential nutrients for your plants. Mix even parts of garden soil and compost, aiming for a loose, well-aerated texture..
Fill your bag with the prepared soil-compost mixture up to around 4 inches (10 cm) deep. This layer will act as the base for your potato plants.
Layering Technique
This method involves planting your potato seedlings in layers to maximize space and yield in the bag. Begin by placing your seed potatoes evenly spaced on top of the soil, with their sprout side facing upwards. We recommend using 3-4 seed potatoes for a 25 gallon bag.
Next, cover the seed potatoes with another layer of the soil-compost mixture, roughly 4 inches (10 cm) deep. As your potato plants grow through this layer, keep adding more soil around the stems, leaving the top few leaves exposed.
Continue to layer soil around the stems as they grow, until you reach the top of the bag. This layering technique helps encourage the formation of more tubers along the length of the stem, increasing your harvest. Remember to water your potatoes regularly but take care not to over-water, as overly moist conditions can lead to rot.
Create Suitable Growing Conditions

Sunlight Considerations
Potatoes need ample sunlight to grow well. Make sure to provide at least 6 hours of direct sunlight each day for optimal growth. If you're growing potatoes in a bag on a patio or balcony, select a spot that receives the most sunlight throughout the day. Be cautious of placing the bag in areas with too much shade, as this can hinder growth and yield.
Avoid Frost
Pay close attention to the frost dates in your area, as potatoes are sensitive to frost. To avoid frost damage, plant potatoes about two weeks after the last expected spring frost. For fall potatoes, count backwards from your first expected frost date. Ensure that the expected maturity days for your chosen variety will occur in plenty of time for your potatoes to get big before fall cold sets in.
Best Location
Choose a well-draining location for your potato bag to ensure excess water can escape. You can either place the bag directly on the ground or elevate it using a pallet or sturdy table. If you have limited outdoor space, such as a small patio or balcony, be sure to:
- Use a smaller-sized growing bag, around 10-gallon capacity, as it's more manageable.
- Utilize a strong, supportive structure for the growing bag as it will become heavy once filled with soil and water.
- Rotate the bag occasionally to ensure even sunlight exposure and promote consistent growth.
Protecting Your Crop
Growing potatoes in a bag is a convenient and space-saving method, but it's essential to protect your crop from various issues that can harm your plants. In this section, we'll discuss facing pest problems, and handling rot issues to ensure a successful harvest.
Facing Pests Problem
Dealing with pests is inevitable when growing any vegetables, and potatoes are no exception. The most common pest you may encounter while growing potatoes in a bag is the Colorado potato beetle. These beetles can cause severe damage to your potato leaves, affecting the overall growth of your plants. To keep these pests at bay, you can:
- Inspect your plants regularly for any signs of infestations
- Handpick beetles and eggs from the leaves and dispose of them properly
- Plant a companions of small flowered herbs like oregano to encourage beneficials
- Introduce beneficial insects, such as ladybugs, to help keep the pest population in check
Remember to keep a watchful eye on your potato plants and act quickly if you notice any signs of pests.
Handling Rot Issues
Rot is another problem that can arise when growing potatoes. To prevent rot in your potato crops, follow these steps:
- Ensure proper drainage. Make sure your potato bag has adequate drainage on the bottom to prevent waterlogged soil, which can lead to rot. Avoid over-watering your plants or resting the bag in a saucer that holds water.
- Use good quality compost. A well-draining, nutrient-rich compost helps prevent diseases and provides an excellent growing medium for your potatoes.
- Inspect your crop regularly. Keep a close eye on your potato plants and check for any signs of rot. Remove and dispose of any affected potatoes immediately to prevent the spread of rot to healthy plants.
- Practice crop rotation. It is essential to rotate your potato crops each year to avoid infecting new plants with soilborne pathogens. In grow bags this is done by using new soil each year.
Follow these tips and keep a vigilant eye on your potato plants. Protect your crop from pests and rot, ensuring a healthy and bountiful harvest.
Anticipate the Harvest

Signs of Readiness
As your potato plants start to display signs of readiness, it's essential to pay attention to some key indicators. Usually, it takes around 70 to 120 days for the potatoes to be ready for harvest, depending on the variety. A good indication is when the potato plants' foliage begins to yellow and eventually die back, indicating that the potatoes have reached maturity.
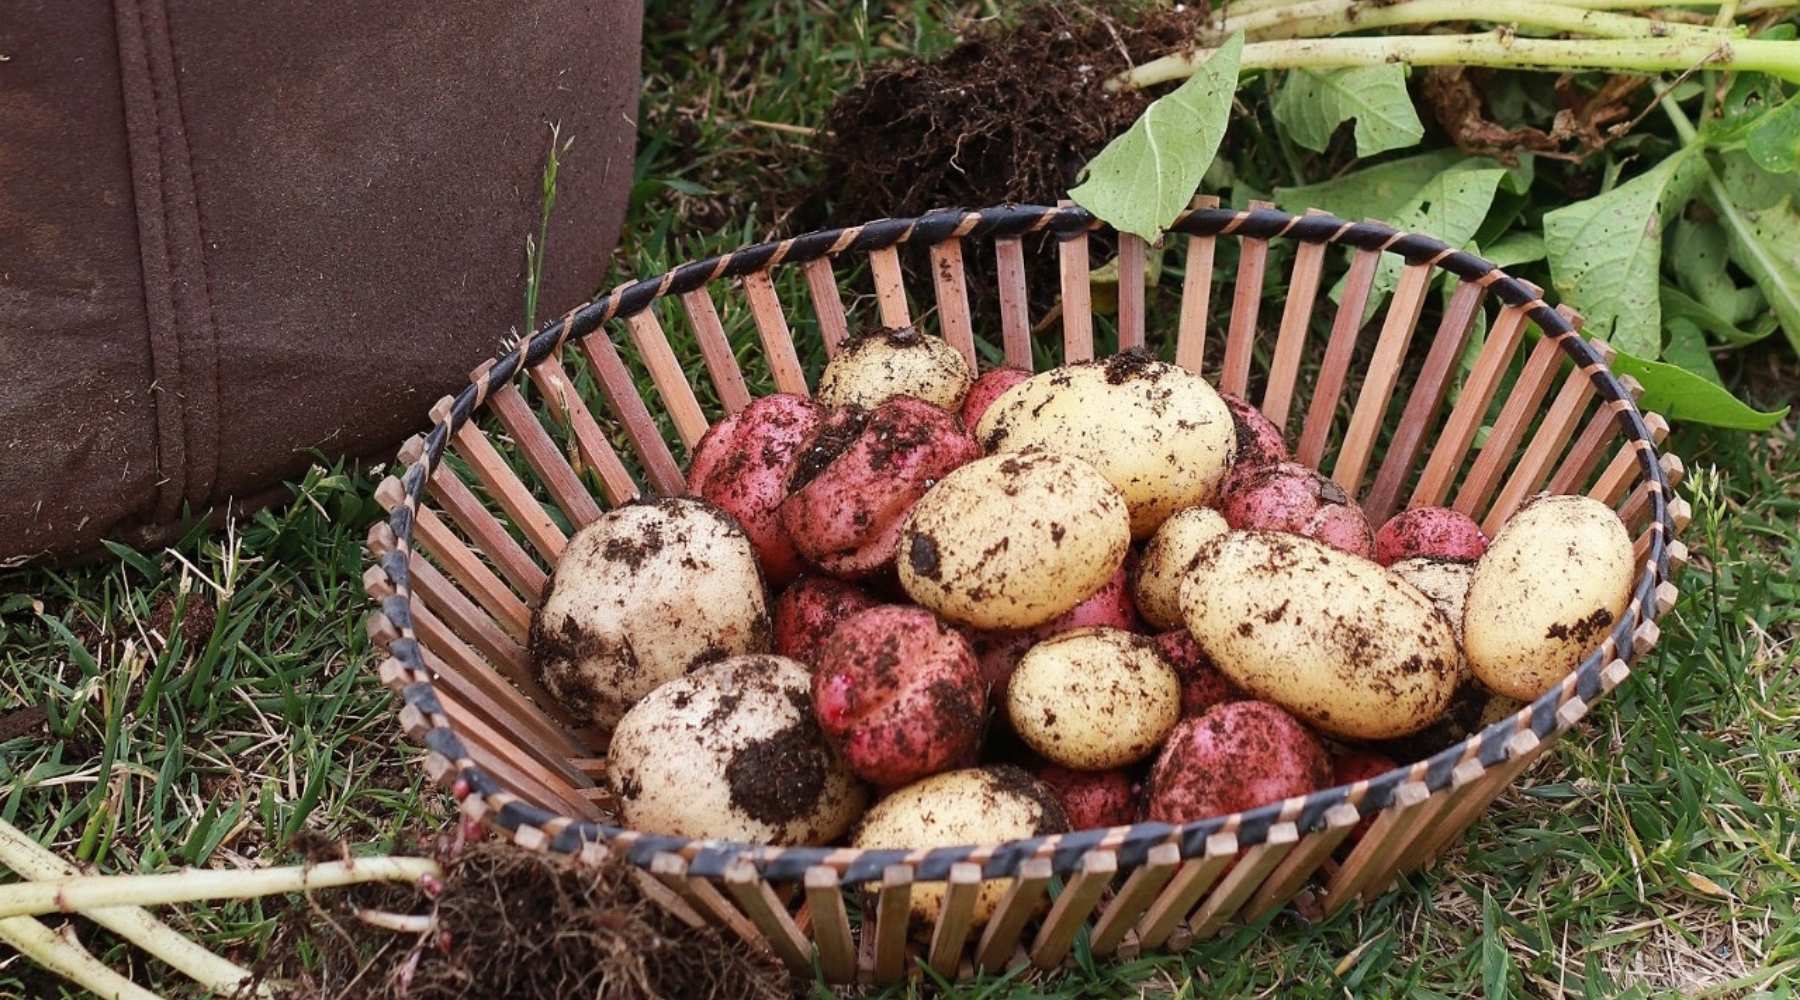
Actual Harvesting Process
When you've determined that your potatoes are ready, the actual harvesting couldn't be easier. Follow these simple steps:
- Prepare the area: Lay out a tarp or newspapers nearby to place the harvested tubers on.
- Loosen the soil: Gently loosen the soil around the bag, being mindful not to damage the tubers.
- Empty the bag: Carefully empty its contents onto the prepared surface.
- Collect your potatoes: Gently pick up the tubers and brush off any excess soil. Avoid washing them as this could cause spoilage.
- Sort by size: Sort your potatoes by size, as smaller ones are great for new potatoes and larger ones for storage. Remove and discard any damaged or green tubers.
Post-Harvest Storage
Proper Potato Storage
After you've successfully grown your potatoes in a bag, it's time to store them safely. To keep your potatoes fresh for an extended period, follow these simple storage tips:
- Store potatoes in a cool, dark, and well-ventilated area to avoid moisture buildup and spoilage. Ideal temperatures range between 45-50°F (7-10°C).
- Keep potatoes in breathable containers like brown paper bags, cardboard boxes, or mesh bags. Avoid using plastic bags because they can trap moisture and promote rotting. A study on potato storage recommends brown paper bags at 5°C for optimum storage conditions.
- It is better to keep less than 50 pounds of potatoes in each bag to prevent damage from excessive weight.
- Regularly inspect and remove any potatoes with signs of spoilage or damage to prevent it from spreading to healthy potatoes.
Preventing Greening
Greening occurs when potatoes are exposed to sunlight. Chlorophyll production gives them a green color, accompanied by an increase in the toxin solanine. To reduce greening and maintain potato quality, follow these steps:
- Keep potatoes away from direct sunlight and artificial light sources.
- Limit exposure to light during storage by using opaque containers or covering them completely.
- Quickly use or discard any potatoes that show signs of greening. Solanine can lead to digestive problems if consumed in large amounts.
By following these storage guidelines, your bag-grown potatoes will stay fresh, healthy, and ready for your next meal. Enjoy your home-grown spuds!
Frequently Asked Questions
What size grow bag is best for potatoes?
When growing potatoes in a bag, we recommend a minimum of a 25 gallon bag. If you want more potatoes you could certainly grow in 50 gallon or 200 gallon grow bags.
How long does it take for potatoes to grow in a bag?
The time it takes for potatoes to grow in a bag depends on the variety you choose. Generally, early-season varieties take about 70-90 days to mature, while mid- and late-season varieties take 90-120 days to reach maturity. Keep an eye on the plant's foliage; when it turns yellow and begins to die back, your potatoes are ready for harvest.
What is the optimal soil mix for growing potatoes in bags?
To grow potatoes successfully in bags, you should use a well-draining soil mix that's high in organic matter. Look for a soil mix that is optimized for nutrients, moisture retention, and adequate drainage.
How deep should the grow bag be for potatoes?
Ensure your grow bag is at least 12-14 inches deep to allow room for your potato plant's roots and tubers to develop. When you fill the bag with soil mix, leave about 4-6 inches of space below the bag's top rim to allow for additional soil when "hilling" the plants as they grow. Hilling helps encourage tuber development further up the plant.
How many potatoes can be expected from a single plant grown in a bag?
The amount of potatoes produced from a single plant in a bag can vary depending on the variety and growing conditions. On average, you can expect to harvest anywhere from 3 to 8 potatoes per plant. To increase your yields, make sure to provide your plants with adequate sunlight, water, and nutrients throughout their growth.
Are there any recommended techniques for watering potatoes in grow bags?
Keeping your potatoes well-watered is essential for healthy growth. Water your potato plants until the soil is moist, but not soaking wet. In general, you should water your plants every 2-3 days during hot or dry periods and every 5-7 days during cooler weather.
Pay attention to the soil moisture and adjust your watering schedule accordingly to prevent overwatering or underwatering. Make sure your grow bag has proper drainage to allow excess water to escape, so the roots and tubers don't become waterlogged.
Resources:
External links to more information.
https://vric.ucdavis.edu/pdf/potatoes/potato_storage.pdf
https://extension.unh.edu/blog/2020/03/what-best-way-grow-potatoes-containers